In the last episode (episode 19) we talked about preparing for handmade Christmas, and I mentioned my Christmas planner. I didn’t go into a lot of detail, because it would have been a very long episode, but a few people asked me to expand on how my Christmas planner is set up and how I use it. I am going to go through that today, but I also want to talk to you about how you could set up a craft planner. So stay with me and let’s talk about some great ways that you can use a planner.
A few years ago I joined an online planner community on Facebook called Planner Addicts Australia. Before I joined this group I only knew about calendars and yearly diaries. I had absolutely no idea about all the different sizes and styles of planners, let alone how enthusiastic people are about them and the multitude of ways they can be used.
Planners come in all different shapes, sizes and styles. A4, A5, Personal, Pocket and Mini … just to name a few. One of my newest additions is a traveller’s notebook. It’s like a planner cover with elastics inside the spine which you use to tuck in little notebooks. That is something I’m going to be using when I take my trip to the USA in a couple of months. I can write about the people I meet, the places I go and document my travels in one of the cute little notebooks. I’ll take some adhesive with me so I can add ephemera (like tickets and business cards) and I’ll leave spaces for photos (I’ll resize them when I get home). It will be like a mini scrapbook of my trip, which I’m really excited about. I honestly had no idea what they were until I saw them in the planning group. And then Rachel Greig from Darkroom Door showed me hers (Rachel, you converted me!). Whatever size planner you decide on, be it fancy & expensive or cheap & cheerful … a date-book, a notebook, let’s talk about ways that you can use it.
My Christmas Planner
The planner I have been using to keep myself organised around Christmas is a personal sized planner. I like it because it’s big enough to write in, but small enough that it fits easily into my handbag. The whole thing is only 19cm x 13cm, and it’s not too bulky at 3.5cm thick. It is a gorgeous red leather planner with fabric lining, and inside it has 6 rings, a notebook slot in the back, a pocket and business card slots in the front, and a pen holder. Honestly … it’s everything I need, and when I spotted it for $7 in the clearance bin at Officeworks, it had to come home with me. The planner didn’t have any calendar inserts inside when I bought it (that’s something you buy separately) but it did have a piece of cardstock inside which informed me this was a personal size organiser, and what size refills I should use (the refills are around 9.5cm x 17cm). You can buy page inserts from stationery stores, of course, but I didn’t want a dated diary … I wanted to make my own inserts. The first year, I just cut paper to size, used the template that came in the planner to mark where the holes needed to be and punched them with my anywhere hole punch. I handwrote all the titles and scrawled across all the pages. It wasn’t pretty, but it was functional. The next year I knew how I wanted to use the planner, so I created my inserts with a lot of fancy boxes and titles in Photoshop. It was a pretty complicated project, and I’m not going to walk you through the Photoshop process, but I will walk you through the different pages that I have in my planner. I will also link to some great planner stores in the show notes where you can buy great planner inserts for a variety of different sized planners, and some will even make custom inserts for you!
The first page is my title page, which also serves as my index. This helps me find what I’m looking for quickly.
From there we move directly onto my gift list pages. On these pages I have lined boxes with names of people I regularly buy Christmas gifts for, as well as some blank boxes for new people who need to be added to the list. This is where I jot down ideas when they come to me throughout the year, and where I write down gifts I have bought, ordered or made. There is a column for price, and a checkbox for when I have made the purchase, received the order or finished making the gift. There is also a column so I can check it off when it has been wrapped. Another way that I use the gift list pages is to write down gifts that I buy quite early in the year AND a note telling future Dawn where I have stashed that gift. You know those times when you put something in a safe place, but it’s such a clever hiding spot that you can’t find it later when you need it … well, this helps a lot, and I’ve not misplaced a gift since I started making notes for future me in the planner.
Next is my shopping list page. This is where I figure out what I need to buy, and where I need to go to get it. This helps me plan my shopping strategically, so I’m not backtracking or running all over town without a plan. I also have a page for Mums shopping list, and I did have a page for my grandmother up until last last year. If you are doing shopping for anyone other than yourself, make a page for them, and maybe colour code the receipts so you can keep track of them.
Next is the page for Christmas cards. In the last episode I talked about this page … it’s where I write down the names and addresses of people I want to send Christmas cards to. Start with the names, then go find all those snail mail addresses. I’ll link to that episode in the show notes in case you missed it. I may not be as organised as I want to be at this point, but I do have all those names and addresses in my planner!
Next … food! I actually have several pages dedicated to food. First is the Christmas Eve menu, which is the big one when we entertain extended family at our home. It is followed by the Christmas Eve Food Prep page, which is like a run list so I can plan out the timing of each dish so everything is ready all at once. It sounds complicated, but I enjoy the challenge. Next is the Christmas Day menu, which is significantly simpler, as these days we have a quiet day on Christmas day. I still have a Christmas Day Food Prep page, though, even if it just says ‘put out leftovers’. Lastly in this category is the Grocery Shopping page. I do like to note which store I need to visit for each item, and I also note which items can be purchased in advance. Hot tip … if you are looking for a packet of vanilla pudding to make brandy cream a couple of days before Christmas, you probably won’t be able to find one! I had the same experience when guava juice with champagne was a popular drink. These are the things I start to pick up in my regular grocery shopping in November, and put into the Pre-Christmas box (I will discuss that a bit later).
Next is the master Christmas to do list, which includes places I need to go, things I need to have printed, wrapping gifts, doing gift tags, sending cards, all those major to do things.
A similar, yet slightly different page is my Christmas To New Year page. This is where I note things I want to achieve in that gloriously lazy last week of December. Naturally, I’m making a list and doing lots of things, so it’s not exactly lazy, but I try to concentrate on things that are going to set me up for a good start to the new year. I have started adding a Business page to this section as well, so I can note things I want to do by the end of the year, or start in the new year for my business.
Lastly is the page titled Notes To Self. This is the page I where I jot down notes to refer to the following year, usually with a cup of tea and maybe a gingerbread man, when Christmas is all done and cleaned up. It’s where I make notes about what worked and what didn’t work. For example, the first year I did a grazing table for Christmas Eve, I noted down the foods that were super popular, as well as the things that people didn’t eat. This means next time I do a grazing table, I can refer back to those notes, and I’ll be able to do it a lot more efficiently. I can also make some notes about which gifts were very well received, and try to jot down the gifts that I received so I can remember to thank people for them properly when I use them.
When I realised that this Christmas planner thing was working well, I added in a Halloween section. We host a Halloween party each year … it started as a way to keep the kids safe, and the neighbours unbothered, and it’s become a tradition that our family and friends look forward to. In the Halloween section I note where the Halloween decorations are, how many bags of lollies I purchase (plus a note afterwards telling future Dawn if it was not enough, just right or far too much), food, a loose schedule for the week leading up and a guest list.
This year I added Easter into this planner. We had a big family gathering here at home so I put the menu in there noted down how many easter eggs I bought for an Easter egg hunt, so that we could make sure that they had all been found at the end of the day. And I have been jamming menus for my birthday tea party in there for the past couple of years, so it’s time to add an official section for that.
Pre-Christmas box
The pre-Christmas box isn’t exactly planner related, but it’s something I find useful. Anything you make or purchase that is for next Christmas … pop it into a dedicated box or tub, and label it ‘Pre-Christmas’. This is where I stash Christmas cards if I buy them on sale after Christmas, or if I receive some in a swap. I bring this tub down from my loft storage in November, and start adding any non-perishable foods to it as I buy them leading up to Christmas. If you have an advent calendar that you use year after year, this is the box you store that in. Having it available means you can start using it on the 1st of December, just in case you don’t get the Christmas decorations down until a few days into December. If you’ve picked up Christmas craft kits for the kids, pop them in this box so you make sure you do them next Christmas. Same goes for Christmas story books and supplies for any Christmas tasks you want to do in November. Make a note for yourself in your phone, on your calendar or in your diary and make sure you get the Pre-Christmas box out in the first week of November … and use it!
By now you have probably figured out that I enjoy entertaining, and planning an event is fun for me as well. Sometimes I ace it, and sometimes it’s all thrown together at the last minute. It is far less stressful when I take the time to plan these events in advance, and I do enjoy them much more. Creating the new pages for my planner is even fun for me. I know … I’m weird.
Craft Planner
Something that nobody knows, though, is that when I bought my gorgeous red planner, I also picked up a second personal sized planner in black (it was $5 … I couldn’t leave it there!). I’ve been wondering for a long time what I will do with this one, and I think that it will become my Croft planner. A question that I’m asked quite often is how to set up a craft planner, and honestly, it is a big question, and there are a lot of options available to you. There’s no right or wrong way to go about this, and the first step is figuring out what you want it to do for you. For me, I would like to use it as a quick reference for colours and inspiration … but that’s just me. I do have a bunch of ideas for how you could set up a planner (any size or shape or style) as a great craft resource
1. Craft supply inventory
When you’re shopping online, in store or at a craft event, it’s not always convenient or possible to look at what you already have. You’re either not at home or maybe you need to make a quick decision before a deal is gone, and there isn’t time to go hunting to see if you already have that stamp set or ink colour. One of the most frustrating things we can do is to buy something that we already have. Returning it is a hassle, and sometimes not possible, so it’s a waste of money and a waste of time. Imagine if you kept an inventory of all of your stamp sets, ink pads, embroidery threads, cross stitch patterns, etc in your craft planner. No more buying duplicates! There are several ways you could use a planner to keep track of your supplies.
If you just have a few stamp sets, you could stamp them out on a page. Now instead of getting out the box with your stamps in them, you can just flick through your planner and decide which one you need. However, if you have a LOT of stamp sets, like me, then that is a task that would not only take a very long time, but also make your planner very thick and heavy. In my case, I would create a page for each brand, and simply note the set names. It is faster, and a much more economical use of space in the planner, and still simple to consult at a craft show when you know you love that set, but is it because you wish you’d bought it, or you already own it.
Another great reference that I will definitely be adding to my craft planner is a section for ink pads. I would have a page for each brand, where I jot down the name, then stamp a tiny motif in that colour next to it. This not only helps avoid the duplicate ink pad situation, but at a glance you can see which colours you have a lot of, and where your colour gaps are. It’s also helpful when you are choosing colours for a project, because you can see exactly what it’s going to look like on paper.
For those of you who sew … if you have a large variety of coloured threads like I do (one of the joys of my life) you can not only inventory your thread colours, but also keep track of how long those spools last. Tape down a little thread on the page, jot down the brand, colour and how many metres are on the spool as well as the date you start to use it. When the thread runs out, note that date as well. This is going to give you a great idea of which colours you use up quickly, and which colours seem to last forever. The benefit of this is that if you have an opportunity to stock up on your most-used colours during a sale, you know which ones you use the most, which is a better investment than buying colours you rarely use. If you take your craft planner with you when you shop for fabric, you can quickly check to see if you have a thread that is properly colour matched at home before buying yet another spool of thread.
This is also a great idea for those who embroider. I have a HUGE collection of DMC threads, and sure … I printed off the checklist and ticked the boxes of all the threads I own. But right now, I couldn’t tell you where that checklist is. You bet I’m going to be reprinting that list, ticking those boxes and putting that list into my craft planner! I think I’ll do a little stocktake and note which threads are close to finished on my wish list / shopping page at the same time
2. Colour Combinations
A very popular trend this year for papercrafters has been ink blending. Kristina Werner has some great videos showing some surprisingly spectacular Distress Ink colour blends (see links below). It makes a lot of sense to me to swatch them out so that I can see what works and what doesn’t, and it helps me figure out which colours I want to buy next or if I’m happy with my collection the way it is. Waffle Flower have also come out with some really clever stamp and die sets for swatching, and (linked below). Here’s why I think some ink combo pages would be a great addition to your craft planner. You know those moments when you sit down to craft and you have limited time … let’s say two hours … and then you faff around choosing colours and stamps and layouts because you’re not sure what you want to do. Before you know it, a whole hour has slipped by and you haven’t done anything. The time you spend adding some tried and true colour combos to your craft planner could turn out to be a great investment in time saving on those days when you have limited time to craft. Turn to the colour combos in your planner, pick one and get stuck into making. Take that time you spend on YouTube, Pinterest, Google or blogs looking at fab colour combos, and turn it into a reference in your hands.
The same goes for Copic markers, or whichever style of alcohol marker you like to use. Create some great colour combo references from natural colour blending families, combo suggestions from your Copic hex chart (linked below … I don’t get a commission on these, I just think it’s a great tool). If you see a great colour combo on a design team member’s blog for a stamp set you own, stamp it out, colour it and write down the colours as a great reference. Side note … for fans of Kindred Stamps, I highly recommend checking out Tania Cordie’s blog, as she shares some great Copic colour lists for Kindred Stamps images (linked below).I remember doing this when I was on my first design team with a very talented Copic colourist, Melanie. She used combos that had never occurred to me, and I still use her blonde hair combo today. My point here is … you don’t need to create all your colour combos from scratch, especially if you have limited crafting time. Of course, if that’s your favourite part, who am I to deny you the joy of colour trial and error … have at it!
3. Wish List / Shopping list
Have you seen a combo you love, but you’re missing a colour or two? Add a wish list page to your planner and make a note. Need a reinker for one of your ink pads? Add it to your wish list page. You can refer to this page next time you’re shopping for craft supplies, or someone asks what you’d like for your birthday or Christmas.
4. Swatching
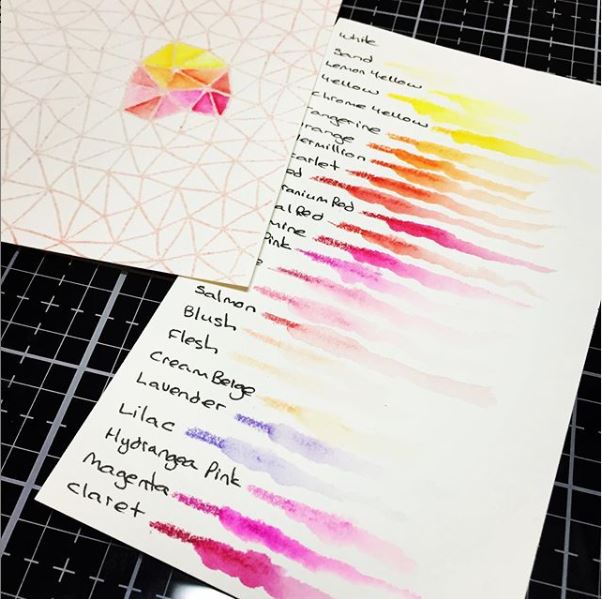
If you are into watercolour, swatching is a must-have section in your craft planner. It might be watercolour tubes, pans, pencils, markers, crayons … whatever your watercolour medium of choice … swatching it out is really helpful. I started switching out my Jasart pencils on a piece of watercolour paper and I love that I can not only see what they look like as pencil, but also what they look like with a little water then washed right out with a lot of water. Now instead of looking at the pencils and trying to remember what colour comes out of them, I just have to look at the chart and locate the appropriate pencil.
Similarly … if you are into oil painting or acrylic painting, swatch those out, note the colours down and have a page for each different brand. I have probably about three different brands of acrylic paint in my collection, so you know they’re being swatched. It will double as an inventory as well, because I have some colours in multiples, which are kept on a different part of the shelf. I do actually have an inventory written down for my paints, and my Distress Inks, and my fave Copic combos, but they’re all in different places on random pieces of paper. I’m looking forward to corralling all that information into a central location … it will be a real time saver (you have no idea how much time I spend looking for those pieces of paper). It will be nice to know whether I need to raid the reserves or add something to my shopping list at a glance next year.
5. Projects
If you are into sewing, then a great addition to your craft planner would be a project planning section. Let’s say you have a quilting project that you want to work on. You could have a page in your planner for the quilt you want to make. This is where you can sketch out your pattern and do calculations (assuming you make your patterns from scratch like I do). Make your shopping list, and create codes for your fabric so you know exactly how this quilt is going to look. Over time you’ll have a great reference of the quilts you have made, which could come in handy if you decide to recreate a quilt for someone who has admired the original. You can keep track of what the fabrics cost, what kind of quilting you had done (was it stippled, quilted with an edge to edge design, custom quilted or did you use a quilt as you go method?). If you love statistics, you could track how long it took to make.
This honestly would have been a smart thing for me to do when I was doing a lot of magazine commissions. Sure, I have all of those patterns written down and stored in a book and a folder, but I wish I’d set up a proper planner in a big A4 binder at the beginning with check-lists for ever project. If I go back to designing patterns, I will definitely be doing that!
If you are on a design team, a dedicated planner would be a great resource for you to keep track of the products you used for each project as well as deadlines. You could keep the finished projects in there, or print a photo to add. Again, I kind of wish I’d done this when I was on design teams, as it would be like a mini scrapbooking album of those fun DT days.
If you make products to sell, this is a great way to keep track of your expenses and how much you sell each item for.
Do you make gifts? What a great way to keep a track of what you made, the colours you used and who you gave it to. For example, I used to make a lot of dolls. I not only made them for my business, but I loved to make them for my little nieces, nephews and cousins. I’d start with a doll with one dress or jumpsuit, then for birthdays and Christmases for a few years moving forward (when they were still little and playing with those dolls a lot), I could give them extra clothes and accessories to go with the dolls. I did keep track of the clothing sets I gave them, so I could make sure I gave them something different next time. I swear, some of those dolls had a nicer wardrobe than I do!
If you like to keep a record of the fabrics that you have, sure you could swatch out your fabrics in there. It would get really bulky really quickly, but if I’m working on a particular project, I’d consider it. For example … one day I’ll get around to making the quilt for my bedroom from the gorgeous navy blue, lime green and white fabric I bought a few years ago. I’m designing it myself, and I’m not opposed to adding some small fabric swatches to that page. It will help with my fabric coding so I don’t make mistakes when cutting and construction. Maybe one day I’ll publish it as a PDF pattern, so keeping careful records is a great idea.
If you’re into paint pouring and you come up with a great method and colour combo, make some notes and use it for inspiration another time.
When I make video tutorial for my YouTube channel, I keep very specific notes of every product that I use in a dedicated notebook. This helps me to write up the blog post, add text over the top of the video detailing particular colour codes, and filling in that YouTube description box. That could absolutely be a section in my craft planner.
Let’s say you are a yarn person. Maybe you knit, you weave, you crochet, you macramé. Create a section in your craft planner for those yarns you buy. When I buy a bulk lot of yarn, I usually have a plan for it. Currently I jot that down on a scrap of paper and store it in a bag with the yarn. But then if I want to choose a project, I have to dig through the whole storage cube (which is noisy if I’m doing it at night, which is when I do a lot of my planning). It would be so much simpler to make a note in my yarn section, perhaps a snipped of the yarn as a visual prompt, and my thoughts on what I wanted to make with it. If I bought it for a specific pattern, I can also note where I’m storing it, either the paper copy or the digital copy. I can also make a note of exactly where I have stashed this particular bag of yarn in my house (yes, I have more than one yarn stash *shhhhhhh*). This would work for embroidery also.
You could also keep some of your smaller patterns in your planner. I keep a crochet go-bag, and a small book in there with some motif patterns would actually be really helpful. I think I talked about this in back episode 18 about crochet (linked below). This would be so handy for one of those times you know you’re going to be sitting around and waiting with nothing to do for a long time, going on holidays, staying with friends, going on a cruise, a long train trip. Sometimes you don’t want to work on a big project, and you just want some options. I love to crochet tiny angel wings, flower or heart motifs when I’m in that mood. I love the repetition, and when I’m done, I can use them as embellishments for a larger project, donate them or gift them to my fab customers.
6. Craft planner AND tote
If you’re into embroidery, cross stitch, long stitch or tapestry, a zip-up A5 planner could double as a project tote. Right now I am looking at my yearly diary binder. I picked it up at the local discount store for about $7, and I’m starting to think I should get a more basic A5 binder for my diary and make this thing my embroidery tote. It would easily hold patterns in the rings if I hole-punch them, and I could store my fabric in an A5 plastic sleeve to keep it clean and flat. I would add a binder pencil case for my embroidery threads so they remain clean and contained. It has a pen holder for my highlighter or pencil, which I like to use to mark off the pattern as I go. There are some pockets on the inside, which are perfect for my little scissors and a book of embroidery or tapestry needles. The whole thing zips up, and it even has a handle on the spine. The perfect combination of planner and tote. I kind of wish I’d bought a few of them, but I’m excited to see if I can find them again.
Other Planner Ideas
A planner is a versatile piece of equipment, and I have seen some fantastic uses for them over on the Planner Addicts Australia Facebook group. Most recently someone talked about having a dedicated NDIS planner, which is a VERY good way to stay on top of therapies and funding. There’s an Australian planner store that does special NDIS inserts (linked below).
I’ve seen people use them for planning a wedding, which is, let’s face it, the best excuse to have a dedicated planner. How lovely to have a record of all of the wonderful ideas and moments you had in the process of planning your wedding … like a time capsule or scrapbook.
I used to have a large section of my diary dedicated to the routines I kept around the house. It was a great way to stay on top of home maintenance regularly. Similarly, if you were embarking on a full-house decluttering mission, a planner would be incredibly helpful. You can make a plan, work your way through and keep track of how much you get rid of. What a great place to keep some before and after photos as well.
How about a wellness or health planner. This is something that could go into an A4 sized binder, or you could have a pocket version with notes that is easy to take to medical or specialist appointments. If you have a family member or care for someone who is unwell, this is a useful tool to have. You can keep note of all their doctor’s appointments, any diagnoses, medication, reactions, allergies, etc. And if you have all of those things in one binder it’s so much easier to take that with you than try to remember everything. If you go to the hospital or call an ambulance, a single medical binder or planner is quick to grab, and could be vitally important for treatment. If you have a family member who’s going into care, or if you’re getting someone else into care for them, all that information is right there. If you’re changing doctors, bam, you’re just taking the whole medical history with you. You don’t have to care for someone with extreme illness to make one of these. It doesn’t have to be big … a little personal sized one might be just right. Maybe a traveler’s notebook will work with a single binder, and individual books for each family member. You can jot down when they had their last tetanus shot, a fever, the flu, an ear infection, the chicken pox and all those mundane things. If you jot them down, you may see patterns emerge … like croup always kicks in at a particular time of year, and then you can be prepared.
Another popular use for a planner is a mood or pain tracker. For those with mental health struggles or a chronic illness, a planner like this can help you see patterns and work with your doctor or specialist to manage your condition more effectively. Using a planner as tool to document behaviour, patterns, mood, pain … this makes it a great resource when trying to obtain the right diagnosis.
I know it’s probably a little redundant to say so, because you have probably already figured it out … but I love planning. I am so much happier when I am organised, but I appreciate that not everybody feels the need to plan or track everything or be super organised. You have to do what works for you. Some people are naturally organised, and others need to work to become so. I mostly love having my Christmas planner (although I think we can all agree I should probably start referring to it as my entertainment planner) because it eases stress so I can enjoy spending time with people I love. I’m excited about my new craft planner, because it will save me so much time looking for things when I could be crafting instead.
Ideally, having a planner is there to make your life easier, so I will leave you with this pro tip. Yes … it is very fun to play with stickers, and do weekly spreads, make bullet point lists and have perfect printed pages with no scribbles. In fact, planners have kind of become the new scrapbooking. It can be very addictive and you can find yourself buying tons of stickers, washi tape, weekly kits and before you know it, you’re spending all your time organising your planner supplies, and no time actually making plans that will make your life easier. If you are setting up this planner to stay on top of a busy schedule, a health issue, your passion project and not get distracted, don’t distract yourself by getting carried away with perfectionism as you set up the planner.
When you set up your planner, it doesn’t have to be perfect the first time. For my entertainment planner, I just cut plain paper inserts, I hand-wrote my titles and I just scribbled on the pages. It was a great first draft, and I found it so helpful that I decided to create printed inserts for the following year, because I knew this was going to be a resource I would use for many years to come. Once you’re organised, if you realise you’ve found a new hobby in decorating and tweaking your planner, and find it fun and rewarding, then absolutely go for it.
It’s so easy to be distracted by all the pretty things, and a common phrase I see is people chasing planner peace. That refers to the search for the perfect planner, which can be an expensive pursuit. Sometimes you just have to pick one, use it for the year and if it doesn’t work, try something new next year. Keep it simple and don’t make extra work for yourself. So whether you are grabbing a notebook or you’re going out you’re going to buy yourself a nice little planner to make your life simple, now is the time that you might pick something up on clearance as they move out the 2019 planners to make room for the 2020 range.
Another thing I see a lot is people with shelves full of planners. I get it … they’re pretty and the stationery enthusiast in me wants them all. So I remind myself that I have a finite number of planners I can actually use, and after spending an enormous amount of time decluttering my home, the last thing I want to do is fill it up with things I won’t use all over again! Right now I have a year diary and my entertainment planner. Next year I will set up my craft planner and a health or medical planner for each family member. Right now, that is pretty much all I need. Maybe one day I will add a planner for all the important house stuff, like service providers, insurance policy numbers and all that grown up stuff … maybe after I get my filing cabinet sorted out. But for now … all I need are those 4 planners.
Just remember … a planner is there to serve you … you do not exist to serve the planner. For example … do you want to spend $200 on stickers for your wedding planner, or would you rather put that toward a fun surprise for the guests at your wedding or a little upgrade on your honeymoon? It is very easy to get caught up in the fun and accessories. Try not to lose sight of the end goal and more than anything … make that planner work for you.
LINKS
Planner Addicts Australia, Facebook group
Aussie Planner chick (including NDIS inserts)
Tia’s Pretty Creations (including custom inserts)
Chasing Planner Peace (including NDIS inserts)
Kouragous Studios (including chronic illness & custom inserts)
Planners Anon (subscription box, includes inserts)
Crazy Organized
May Paper Co
Kristina Werner Ink blending:
https://www.youtube.com/watch?v=qJ3Cah5esns
https://www.youtube.com/watch?v=eLev1dSX2Ew
https://www.youtube.com/watch?v=vfEI-qfcF9s
https://www.youtube.com/watch?v=RJ7OFrZIjSw
https://www.youtube.com/watch?v=mdOKqYW3eWI
https://www.youtube.com/watch?v=P3zBoE4jsk8
https://www.youtube.com/watch?v=hDTYeFp1bl0
https://www.youtube.com/watch?v=cTjMn1XkG6Y
Waffle Flower, Colour Combo stamp & die bundle
Waffle Flower, Color Wheels stamps
Waffle Flower, Combo Swatch stamp
Waffle flower, Combo Swatch stamp & die bundle
Other Planner supplies
Copic Hex Chart by Sandy Allnock
Tania Cordie’s Paper and Me 2 blog (Kindred Stamps character Copic combos)
Episode 18 – Crochet
Love this Podcast!! I have a binder than holds my event pages (Labeled celebrations), I just need to effectively use it. I love the idea of a craft planner too although I’m sure it will mostly be an at home planner as I think it would be too large to take with me. I do have a file that I started putting card templates in, so I might work from there. Youv’e inspired me to get back to planning, I have got the bones set up and really no supplies to buy……I’ve bought a bit in my perfect planner search in the past, time to use them!!
I hope you have lots of fun putting that planner together, Larissa!
Dawn