Hello … welcome to The Craft Room where we are going to be talking about some clever craft storage solutions. In Episode 11 we talked about crafting in a small space, and we did discuss craft storage ideas. There is no denying that in order to work efficiently in a small space, you need to have some clever storage solutions. But there was so much more I wanted to tell you, so this episode is kind of a sequel.
For starters, did you know that I have a craft storage Pinterest Board with over 900 ideas for clever craft storage? I will link to it in the show notes, because sometimes it’s when we see what others are doing in their space, with their supplies, that we find a solution for ourselves. Some ideas are for small things, like sewing threads, and others are for full walls or rooms. I have found a lot of inspiration in there for myself, and I hope you find something on that Pinterest board that sparks an idea for you when you CLICK HERE.
In episode 11 I mentioned that I store my papercrafting
embellishments by colour, and I wanted to talk about how my colour storage
system came about … but I didn’t want that episode to run any longer that it
already did.
These days I store pretty much all of my craft supplies by colour. I work by colour, and so it makes perfect
sense to store my supplies by colour. It makes them easier to find, which saves
me time on so many levels. But it wasn’t
always like this. In my last house, I
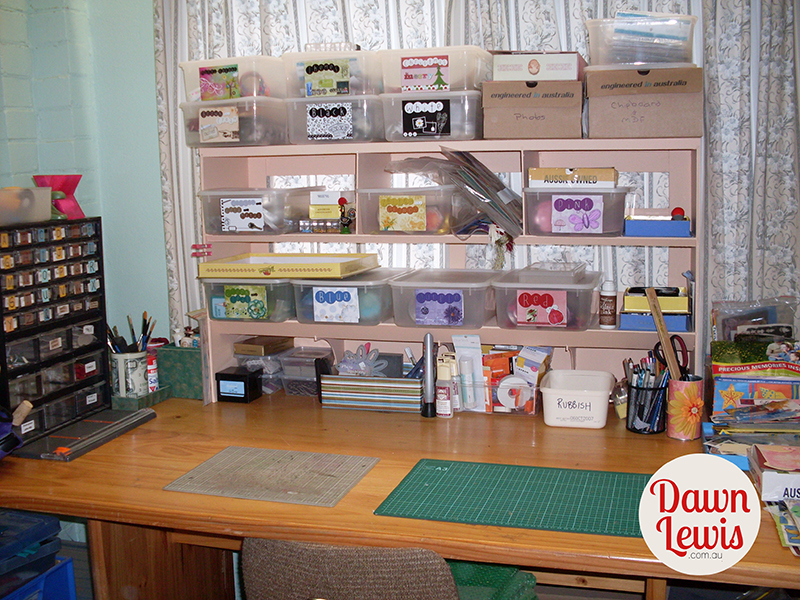
had the luxury of a long narrow room where I kept my craft supplies. The beauty
of it was that I could leave a project half finished, stuff all over my desks
(yes, I had the luxury of 2 desks), and just shut the door. However, when we moved to the home where we
live currently, there was no hideaway room for me, as this house is very open
plan! I had a small folding desk and a couple of kids bookshelves, and all of
my papercrafting stuff had to fit on, under and next to the desk out in the
open where all sorts of inquisitive little people, kitties and anybody visiting
could see it. It was incredibly
difficult to keep the space tidy, and I couldn’t just close the door on it.
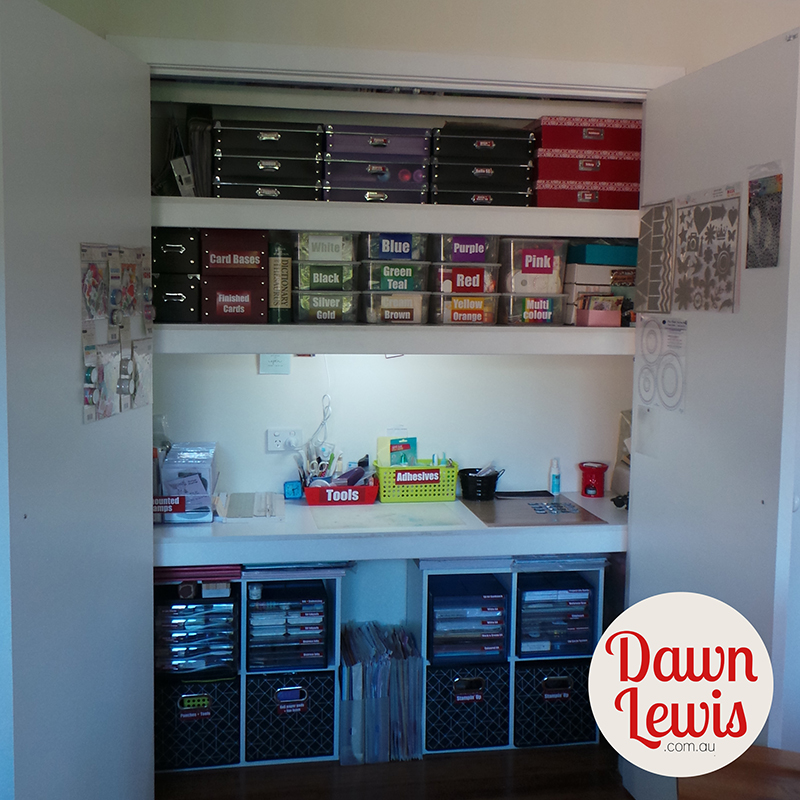
Eventually we did put an extension onto our home, which is where my new craft
cupboards are located, but while it was still out in the open, I was coming up
against the same issue all the time.

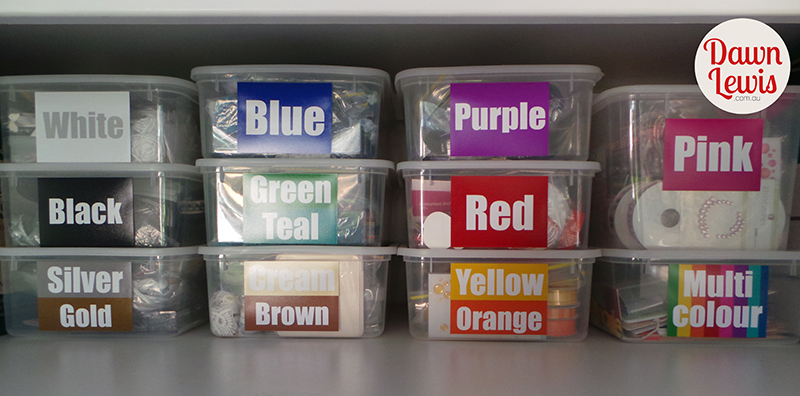
My embellishment stash was really a scrapbookers’ dream come true. I had little storage containers full of all sorts of fascinating bits & pieces. But when I wanted to create a layout using, let’s say, purple and green, I would pull out the ribbon box to find purple and green ribbon, then the button box to find purple and green buttons, the eyelet box, the fibres box, the sticker box … you get the picture! It took up heaps of desk space, and if I put them away after pulling out what I thought I wanted to use (so I had enough space on the desk to work), then I would need to get them all out again to put away the pieces I didn’t use. It was a hassle, and it was actually stopping me from crafting. I can’t remember exactly what sparked the idea, but one day I’d had enough, and decided I needed a better system. Clearly, I was choosing embellishments based on colour, because I work by colour. I would look at the photos I wanted to use, choose my colour scheme, then create chaos on my desk. So I decided it was time for a change … I was going to switch to storing my embellishments by colour.
I had limited space, and my only option was to go up. I went looking for tubs, and hit the jackpot in The Reject Shop kitchen aisle. I found small 5L rectangular clear tubs with lids that allowed them to stack. They were perfectly sized, inexpensive, and readily available. I put this system into place about 9 years ago, and those tubs are still available today. I bought ten 5L tubs at $2.50 each, and I grabbed a 10L tub for my pink embellishments (because girls + scrapbooking = lots of pink stuff!). I also bought 100 small zip lock bags and a pack of sandwich size zip lock bags. That was all I needed to start. There were some colours that could share. I had very little yellow and orange supplies, so they would share a tub, as would cream & brown, black & grey, and green & teal. Gold, silver and other metal pieces also had their own box.
I laid out all the empty tubs on the floor with the lids under them. I grabbed the little clear caddy that had all my buttons in it, each in their own little section, sorted by colour. I opened a small zip lock bag … and just started bagging buttons by colour. I bagged all the red ones and tossed that bag of buttons in the first tub. The I bagged the orange buttons and threw them in the next tub, along with the baggie of yellow buttons. I kept going like that until the button caddy was empty, and there was a bag of buttons in every box … in colour order … of course. Then I tackled the eyelets box, bagging each by colour and adding them to the appropriate box. When that caddy was empty, I moved on to the brads, the ribbons, the fibres, and all those funny random little bits and pieces I’d been collecting for years. By the time I had a tower of empty caddies on my desk, I was starting to realise that I did NOT want to rummage through baggies, constantly opening and closing them to get what I wanted. As luck would have it, I had the same number of empty caddies as I did colour tubs. It was extra work, and definitely double handling … I seriously wrestled with this decision … but I knew it would save me time in the long run … I emptied each of the baggies of tiny pieces into each of the compartments of the clear sectioned caddy. In most cases I was able to split out large buttons from medium buttons, large eyelets from small eyelets, round brads from shaped brads, and there was plenty of room to keep everything separate, yet see it all at a glance, and never need to rummage for those tiny pieces ever again. I left the ribbon, paper flowers and fibres in their baggies. Flat packaging, like stickers, skeleton leaves, adhesive gems, etc went on the bottom of the tub, keeping them flat. The caddy full of tiny monochromatic goodness went on top, small bulky items like washi tape and coloured glue sticks went around the edges, and the squishy baggies went beside or on top of the caddy. I do have 4 other slimline cardboard boxes that live beside the colour tubs, sorted by theme (school, zoo, Christmas and favourite swap pieces). I kept these separate because when I want Christmas stuff, I don’t want to look through every colour box to find it. I can choose the Christmas embellishment, then go looking for colour matches if I need more.
The process took me about a week, and I did it in small bites of time, at times it was a bit boring, until I found lots of cool stuff I forgot I had, but I loved the process and the result. I don’t remember how much I must have talked about this new system online, but I know myself … and when I’m excited about something I really do go on about it pretty much non stop. But this system was working so well for me, I was sure it would work well for anybody else who worked by colour. It was so much faster to create that purple and green layout now. I just grabbed the purple box and the green box, chose my embellishments, created the project, put the unused items back in the boxes, put the lids on and put them back on the stack. Everything was at arms length, and I was just venturing into the world of Copic markers, back to making cards as well as scrapbooking. I was so pleased with my new system, and happy in my tiny creative space, which was much faster to pack up and easier to keep tidy.
But while I was feeling very happy with my new found storage solution, my friend Linda was struggling with hers. The day she mentioned that she had just walked into her little craft room, despaired at the mess, and just walked right back out … that made me very sad. She was an amazing crafter. It truly was her happy place, especially while she was going through some pretty serious stuff. I couldn’t push it out of my mind, and I really started to wonder whether my new storage system could be replicated in her workspace. So, in the name of craft science, I drove 5 hours out to Cowra with 13 tubs, colour labels and all those zip lock bags from my own embellishment makeover. I spent the weekend with my friend, drinking tea, catching up, and sorting through her craft room. We not only sorted things into colour tubs, but I put her through a full declultter as we went along. There was no way I was leaving until the job was done, and even though she ran out of steam before I did, I was still able to hold things up and have her make some decisions. Boy did we find some interesting things! Linda had some clever storage solutions of her own that we were able to tweak just a little to get them humming again. For her 12×12 cardstock and papers, she had hit up the local pizza shop for some new pizza boxes (at a very low cost). She stacked them, secured the lids, but cut out the front section … thereby turning them into clever lightweight inexpensive paper storage. She also had a unit full of tiny little drawers that she used to store her chipboard letters and numbers. I’ve never really used them very much, but she used them all the time. It was a clever system, and it came from the hardware store! Remember in Episode 11 I suggested looking outside the craft box for storage solutions? She had done that with great success, and I remember using a similar mini drawer unit many many years ago. So don’t forget to check out the storage solutions at your local hardware or auto store … you may be pleasantly surprised.
When we were done, Linda was delighted, and I was thrilled that I was able to help her reclaim her happy place. Linda used that storage system, even after she moved house twice, right up until her health deteriorated to the point where she could no longer craft. I am absolutely humbled that I was able to do that for her. It cost very little, but it was worth SO much. As far as craft science experiments go, I call this one a success.
So … having done this makeover on my own, and with a friend, I have to say that it is MUCH faster and more fun with a friend. If this is a storage system you think would work for you, find your favourite series on Netflix and get stuck into it! Even better, if you have a crafty friend, and you both love this idea, take turns helping each other … crank up some tunes, put the kettle on, and have some fun sorting out those fab stashes.
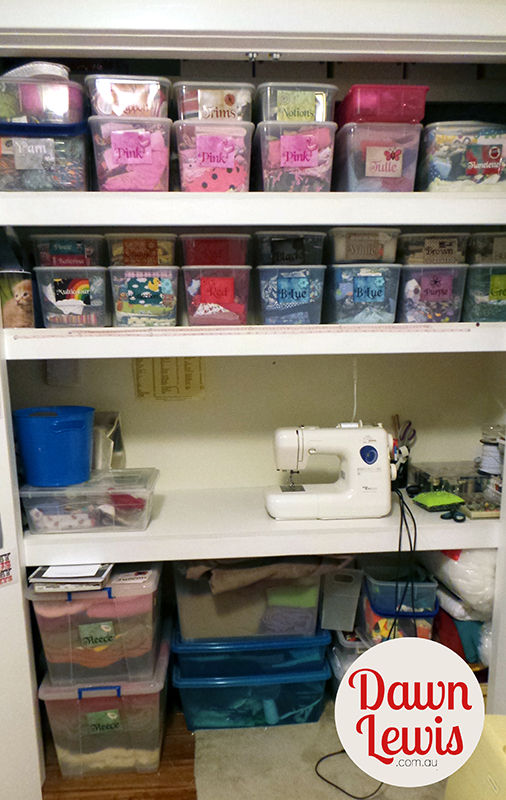
Now … I haven’t forgotten the fabric peeps! I use the same tubs and storage system for my fabric. As I mentioned in episode 11, I store my fabric in one of two ways. Fabric purchased to make a specific quilt project is bagged together in a large tub under my sewing desk. All other fabric is sorted in colour tubs … in fact the exact same tubs that I use for my papercraft embellishment storage. I admit that I have purchased way more fabric than will fit into those tubs, and the entire cupboard is in desperate need of a cull and tidy up, but the system works. There are some exceptions to the rule, though. I do have tubs for specific types of fabric, and that’s because when I had my doll-making business, I needed to keep them separate. I have tubs for tulle (for dolly tutus), flannelette (for dolly pyjamas), yarn (for dolly hair), as well as trims and notions. When I do my fabric cupboard makeover, though, I will be sorting tulle and flannelette into the appropriate coloured boxes, the yarn will be added to my acrylic yarn storage in the hall IKEA cube unit … but trims and notions will keep their own boxes.
I store my paint in colour wheel order, each different brand has its own storage unit. I keep my Jo Sonja tubes of paint and mediums in a basket. It’s just the right size so that they stay standing up, and I can see the colours at a glance from the top. I keep my Semco acrylic paints in drawer units I bought at Kmart (kitchen department for the win again!), as they fit perfectly, and I can stack 2 units on the shelf to save space. It’s like a high rise apartment for my paints … which live in colour order so I can find what I need quickly and easily.
But … when it comes to my embroidery threads, I actually don’t store them in colour order! You may be wondering why this is so … and I will tell you. When working through a cross-stitch pattern thread key, they are listed by number. So all of my DMC threads are wound onto cardboard bobbins, and placed lovingly into proper embroidery thread caddies in numeric order. I tried keeping them in their natural state, but I got to a point where I had so many that it was impossible to keep them organised, and the tangled mess took a very long time to sort out! Winding them onto bobbins took time, so I did that in front of the TV at night. I must admit, that while it’s an investment of time, it really does make it easier to find the threads I am looking for. When I start a new pattern, I pull the cards out of the caddy, and I store them in a zip pouch with small scissors, my pattern, aida fabric and tapestry needle. I try really hard to only work on one cross-stitch pattern at a time, and when I’m done, all of the thread bobbins go back into the caddies. The advantage to this method of storage is that there are blocks of colours that work perfectly together in numeric order. I recently found this to be very handy when working on a new class design that I’ll be teaching at the shop, which features ombre painting on fabric, as well as simple hand-quilting as one of the finishing options. I’ll pop a link to the class in the show notes for those who are local and curious to check it out. Also, when I’m doing some free-hand embroidery, I like to open the caddies and just see which colours take my fancy at the time.
It’s the same with my Copic markers. I keep those in order by code. Sure … that does follow the colour wheel, which makes me happy, but if I kept all the light blue together, then mid blues then dark blues, it would take me forever to find the marker I was looking for. I work entirely by codes when it comes to Copic colour choices. I use the Sandy Allnock hex chart to keep track of my colours, and to help me choose colour combinations. It’s an excellent resource for serious Copic colourists and you can find it when you CLICK HERE.
Finding the ideal storage solution for you may take time, and it may change over time, especially if you change the way that you approach your craft of choice. But when you get it right, it can save you so much time and mental bandwidth, that it’s worth the time and effort taken to get it set up. I encourage you to ask yourself … is my current craft storage working for me? If not, why not? What would make this whole process easier? And if your current system does work for you, that is so awesome, and I hope you will get in there this week and make something just for fun.
26 May 2021 Edit
This week I was invited to contribute to a great online article about creating the craft room of your dreams. There are some excellent tips from a whole lot of crafting experts, so I invite you to have a read of it HERE.
Thanks has given me a few more ideas to try. Have had colour boxes for awhile. Copic markers are in my panda pencil case and other markers, etc are in other panda makeup purse, panda bag, you get the idea. Paper storage is in expansion folders, drawer units and wallets, am trying to minimize and make easier. Washi tape on carousel and packs of cut outs,embellishments, etc are in clear shoe boxes from reject shop.
You are currently keeping me company as I overhaul my craft supplies. Hubby made me some craft benches for my birthday, just before we found out we had to move.
We have our own house, but the company hubby works for is 4 hours away from it, so they rent us a house near his work & the one we were in was sold.
I hadn’t got to set up my craft supplies before moving, luckily, so I am sorting as I put things away.
So happy I can keep you company during your treasure hunt!