Hello, welcome to the craft room podcast. Thank you so much for joining me today. And if this is your first time here, a very special welcome to the craft room to you. Now today as I mentioned, we are talking about scrapbooking, and it is a big topic.
Today I want to talk mostly about … what is scrapbooking? … how I got into scrapbooking … and the different types of scrapbooking. Because as much as I wanted this to be a ‘here are the top 10 things you need to start scrapbooking’ type of episode, there are different styles and forms of scrapbooking, and you need different things for each type. So … I AM going to give you my top list of needs, but we will also talk about the wants, because that’s the fun stuff, right. I’m also going to talk about why we scrapbook, the importance behind it and share a couple of very important projects that I have done. Let’s dive in.
If you’ve never heard of scrapbooking before, it is essentially the art and craft of taking your photographs, recording the memories & details, and adding a decorative element. At least that’s how I see it. Scrapbooking has been around for almost as long as photography. Think about it … back when photography was brand new … not everyone had a camera, film was expensive, processing was expensive, and therefore photographs were valued. It made sense to decorate something so valuable, and even more sense to document the events that accompanied the photographs. These days, we have digital photography … I mean … we can take a photograph with our phones! When you think about it, it’s quite amazing. But there’s always been this element of taking a photograph and recording the memories and the details associated with the image, and it’s in the recording of the details that more value and significance is added to the photo.
People have been adding decorative elements for a very long time. But scrapbooking as we know it now, I consider to be a very modern craft. And that’s because a whole industry sprung up around it, I mean, specific products just for adding with your photographs. It’s a relatively new concept.
I got into scrapbooking around 20 years ago, and there were so many factors that made it a certainty that this was going to happen. This was going to be my new hobby.
Number one, I was a keen photographer. I have always loved the challenge of capturing that perfect image, but also recording family functions and activities. I was like the unofficial photographer in my workplace, and I’ve got literally thousands of photographs in my home. So photo & camera buff … check!
Number two … I was already a card maker. I already had supplies and tools that lend themselves very nicely to moving over to scrapbooking. So I wasn’t starting from scratch. Let’s check that box.
Number Three … I had a baby. I was a new mum, and I wanted
to record all these baby firsts, the cute things and all the candid photos. I
had this brand new, gorgeous little subject to document. Let’s check that box.
Number Four … One of my very best friends had become a creative memories
consultant. She was super enthusiastic about scrapbooking. I like to support my
friends when they have a new business. So let’s check that box.
Number Five … The one that finally cemented this as my new hobby … I was on a
TV game show. And I won a prize package that included scrapbooking gear! There
were albums and papers and page protectors and all these themed kits like
wedding and travel and pets and babies. And when my friend found out I won this
prize pack, that was it. She’s like, come on, you’re coming over, I’m getting
you started. In fact, she invited me to a crop.
Now if you’ve never heard of a crop, it’s essentially a scrapbooking event, held in a community hall, church hall, scrapbooking store or someone’s home. You take your scrapbooking gear, go out with other people and you all work on your pages in one big room. It’s a fun night of social activity. And as a new mum, who was home by herself all the time, this was fantastic for me … a real sanity saver. So I went to my first crop, and I created my first layout. If you’ve never heard of it before, a layout is simply just the page you create to put into your album. A single layout is when you create one page and a double is when you create two that pair up when you open the album, one on the left and one on the right. So, along I went to this crop. There was somebody there who was selling scrapbooking supplies, I bought a few things, I took a few things with me, my collection was painfully small. And I created my first layout.
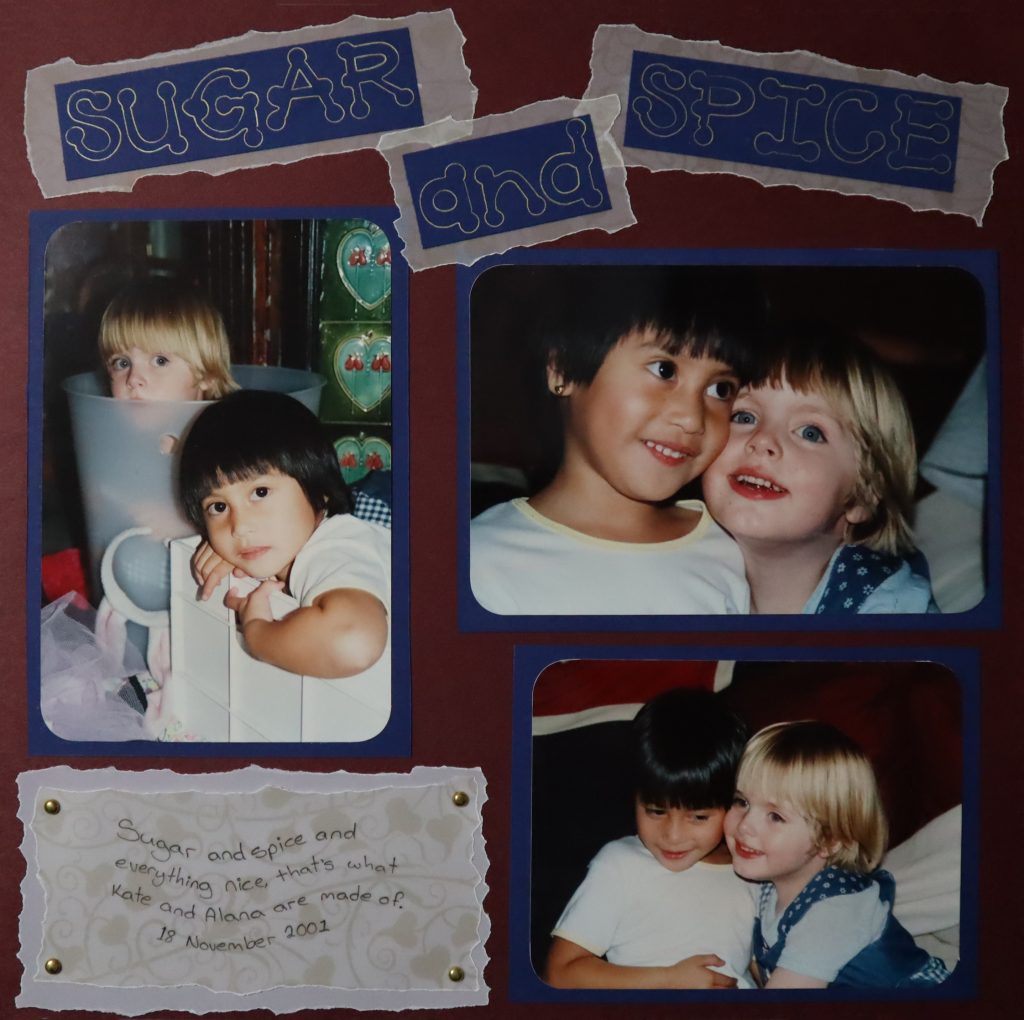
My first layout was photos of my daughter and my friend’s daughter playing together in our home. It’s very fitting that that was my first layout. And you know, for my first go, I think it’s not too bad.
I went on to create hundreds of layouts. And I don’t actually have them in albums properly yet … not all of them. That’s my summer project that I’m determined to get done, preferably before my next birthday. I rarely scrapbook now … I don’t have the time for it, and I kind of outgrew it. But that doesn’t mean I don’t still record memories with photos. But we’ll get into that a little bit later on. Because right now let’s talk about the different types of scrapbooking.
There are probably what I would call three main styles of scrapbooking. The first one is what I refer to as traditional. This is taking your photos, placing them down onto a backing sheet of card stock, adding your text … like your names, dates, places, stories, all the written word that goes with it known as journaling … and then adding a decorative element. You might add borders, titles, flowers, stickers, there’s all sorts of embellishments, but we’ll get to those later.
For traditional scrapbooking, there are really 10 things that you need to start scrapbooking.
Number One – Photos
You can’t make a scrapbooking album without photos. Now a word about pictures that you’re using in your album, if you are using something that you have the negatives or the files for and you can very easily reproduce, feel free to cut it up into whatever crazy shapes and strips, colour or paint over the image and do whatever you like with it. But if you are working with old photographs, of which there is only one copy, or if the photo is old and historic, you want to be sure you scan that first. I would also recommend not securing it permanently in your album. For me, when it comes to old photos, if I’m adding those to an album, something I don’t have a copy of, I will scan it first. And that way I have it on file, and I’ll back it up in a few different places, as well just you know, just in case. I’ll usually add it in with photo corners so that I can remove the photo from the album, if needed. So let’s say I scanned it, I added it to a file the file corrupted, it means I can remove it from the album and scan it again if need be. So that’s just a little hint and tip about your photos.
Number Two – Album
I know that might seem obvious … you can’t create a scrapbooking album without an album of some sort. There are a number of different types of album to choose from. The most common are post bound and ring bound albumd. My personal preference is the ring-bound, however, both have their pros and cons. Let’s talk about post bound albums. Each time you buy a pack of page protectors, you receive a set of post extenders in the pack. You can actually take the front cover off the post bound album, screwing in the post extenders, add your pages and then put the cover back on. It allows you to expand your album to quite a decent thickness, the bonus of that is you can fit as many pages as you want in an album. The downside for me is I find the posts and the little screw pieces to be really frustrating. And there’s nothing worse than going through all the frustration of putting an album together then realizing you need to put one more page in there and having to take it apart, add another page and then try and put it back together again. I prefer ring bound albums, however, I used the post bound albums for a long time because I won a bunch of them in my prize pack. Why would I go buy something new when I had something suitable already … so I used them. They did the job, and they’ve held up really well.
Then there are the ring bound albums. I kind of prefer those because it’s easy, you just open the rings, add your page protectors, then snap the rings back together. However, if it gets a lot of wear and tear and kids are looking at them all the time (especially if you’ve overfilled it), the rings can kind of pull apart. And remember your lever arch folders from your school & office days? Sometimes the rings don’t close perfectly. And that can be frustrating. However, you know, if you have the album to capacity, you don’t intend on adding or subtracting from the album, you could tape around those rings where they have a gap, and just leave it that way.
So … you know … pros and cons to the different types of albums. Honourable mention does go to the old creative memories albums. They were strap bound albums, which were really clever, because each page had a little kind of like a long staple that came out of the side of the page. You could run the strap through there, which made them easy to put together and take apart. Sometimes I kind of regret not using this album style, however, the way that they went together meant you had to scrapbook chronologically, and I wasn’t working that way at that time.
The last thing you need to know about albums is not only are there different types, there are different sizes. When I when I started it was mostly 12” x 12”, and 8.5” x 11” albums. The 8.5” x 11” albums weren’t super popular here in Australia, because that’s American letter size, which was hard to get here, although not impossible. I started with 12” x 12”, and my kids used the 8.5” x 11” albums, because that’s what was in my prize pack. As the years went by, different size albums became available. I’ve worked with 8” x 8”, 6” x 6” and have even created some little 4” square albums and an album in a tin. That’s not even going into all the shaped MDF albums, paper bag albums, and other trends and clever products that have come and gone over the years. But if we’re talking traditional layout, generally speaking, I’m going to assume 12” x 12”, or 6” x 6”, as they seem to be the most popular.
Number Three – Page Protectors
Page protectors are essentially just a plastic sleave that you slide your layout into when it’s done. It protects it from the elements and whatever is on the opposing page so things aren’t damaged. It protects against dust, sticky fingers, coffee spills, and other such potential disasters that may ruin your hard work. And you can’t have a ring band or a post bound album without a page protector, it just it just can’t be done. You can get them in all different sizes to suit all the different kinds of albums that are around. But here is my recommendation to you. If you already have your album and you’re going looking for page protectors, it’s advisable to take your album with you. Page protectors vary from brand to brand, and may have the holes for your posts or rings in different places. It’s almost like smartphones … there’s a new release smartphone, and oh my goodness, it’s got a different charger. Now you have to buy our charger for your phone. It’s a similar thing with albums and page protectors. It’s a way for the album companies to make sure you buy their page protectors to fit in their albums. Because let’s face it, we buy the album which has the pretty cover that we want. And so then you have to buy the page protectors that fit into that album. So if you already own page protectors take one with you when buying an album, if you already own an album, take it with you, when you’re buying page protectors.
There are some workarounds if the holes don’t match up with the posts or the rings. You can punch yourself some new holes, though I would recommend reinforcing the spine of that page protector first. There are a couple of ways you can do this. The first would be to use washi tape, put it down along the edge of the page protector before you punch the holes. Not only on the front, but also on the back. The next thing would be using hole reinforcing stickers, which you can get in office or stationery stores (like Officeworks). It’s a pretty common office supply which kind of looks like a little sticker donut, and it reinforces the holes that have been punched. Because it’s a photo album, people want to look at it, turning pages, there’s going to be stress on the holes. And if it’s a hole that you’ve punched, and it’s not reinforced, like the ones that come ready done, and especially if the new hole is overlapping an existing hole, you need as much support as you can provide.
Number Four – Adhesive
There are a lot of things to stick down! There are a couple of tips I want to give you fist up about adhesive. The first is you need it to be acid-free so it doesn’t create any damage to all of the product you’ve purchased, the work you’ve put in and the photos of value that are in your album. The second thing I would say is skip dollar store adhesive. I know it’s tempting, I have a lot of it. I used it early on the when it first hit dollar stores, thinking I could save some money. Everything I stuck down with that has yellowed, damaged and some of it has just fallen off. So skip dollar store adhesive. Dollar stores have plenty of other things that are very cool, but adhesives are not one of them.
There are a lot of different types of adhesive. Like I said, I think I could do an entire episode just on the topic of adhesives. Maybe I should do that one day, I’ll make a note. But in my adhesive collection, there are three that I use more than anything else. The first is double sided tape. I use so much 3mm double sided tape … it is inexpensive, it’s petite, it’s acid-free and it is cheap. I like the Xpress It brand because it’s a good strong adhesive and a 25m roll is only $2 25. I’ll link to it in the show notes. For the times when I want a little bit of dimension, I use 12mm double sided foam tape. I prefer the 12mm because I can cut big pieces if I want to, but can trim it down if I only want something small. I also use the Xpress It brand foam tape. I’ll link to that one as well.
My third most favourite style of adhesive is a good liquid glue. I prefer white glue over a clear glue … they tend to be too liquid and can make cardstock and paper buckle and warp. My very favourite brand is Tombow Mono liquid glue. I love that stuff! It comes in a double ended applicator. One end has a super fine applicator, and you can apply very, very tiny dots to super intricate dies or tiny places. The other end has this silicon chisel nib, so if you need to apply a lot of glue over a larger area, you can. I find that one bottle goes a very long way, and it is not only a great permanent adhesive, but if you apply it and let it dry, it becomes a great temporary adhesive as well. I’ve never had huge problems with the nibs clogging, and it’s a fantastic adhesive. I’ve just found a new supplier in Australia, so hopefully that’ll be coming back into the store soon.
Now of course there are other adhesives that I use. Sometimes I will use a dot runner, snail type of adhesive (which is kind of like a rolling whiteout, but it’s adhesive). I sometimes I use a vellum adhesive, I don’t know if they make it anymore, but I have this scotch vellum adhesive which is invisible under vellum. It’s the only one I’ve ever found that does that, and mine is probably 15 years old. Glue sticks are sometimes found in scrapbooking supply stores, but I’m not really a fan. Anything I stuck on in the early days with a glue stick has fallen off the page and is now sitting in the bottom of the page protector. And I’ll be going through and adhering those things properly when I put all my albums together properly this summer.
Number Five – Trimmer
You need something to cut these big pieces of 12” square cardstock and pattern paper, but I’m not going to go much into trimmers, because I already talked about those in Episode 4. If you haven’t listened to that one yet or want a refresher, I will link to it in the show notes. I also talk about die cutting machines. That is not something I consider necessary for scrapbooking, it’s certainly a want, and I had been scrapbooking for many years before I bought one. But basically, with trimmers, there are 3 main styles – guillotine style, blade in track style or rotary blade style. When I started I didn’t have a trimmer, just a metal ruler, a craft knife and a self healing cutting mat. As long as you have something that is going to cut a proper straight line, that’s all you need.
Number Six – Cardstock
You need to lay everything down on something, and that something is usually cardstock. When you buy page protectors they usually come with a piece of cardstock inside the sleeve. I’ve bought them with white cardstock and black cardstock, but if I want a pink background, or a green background or an orange background, I’m going to use a separate piece of cardstock for that. You can buy your cardstock in individual pieces, which is great, because you can just buy the colours that you want. You can also buy them in packs, which are great value, but you’re kind of stuck with all the colours in the pack. If you use a lot of pink, you’re going to go through the pink quickly … and then you’re going to need to buy more pink, which is when it’s time to start buying individual sheets.
There different kinds of cardstock, like smooth, textured and even cardstock with a different colour in the core (so when you tear it, you see a different colour … very cool!). Generally speaking, cardstock is most readily available in 12” x 12”, which you trim that down for smaller album sizes. I have seen cardstock packs that are 8” x 8” and 6” x 6”, not so much now, but they were around back in the day. And then of course, you know, if you want to, you can use all sorts of different card stock that you’ve got already in your craft stash. If you’ve got it, try it out … why not. Just be mindful that you really should be using acid-free supplies, so if in doubt, don’t.
Number Seven – Patterned paper
We’re starting to move into want territory here, but these are things that I recommend getting (maybe just don’t go as overboard as I did). I love patterned paper. I have more of it than I will ever be able to use in my lifetime. A personal challenge for me in 2019 has been to use all the leftover patterned paper and cardstock on my desk. It doesn’t seem to matter how many projects I make, I am still not getting through that stack! I’ve taken to just making blank card bases so that I can add coloured images and sentiments to them later on. I have always saved leftover patterned paper … and while I’ve tried a few different ways of storing them, my current method is my favourite. I use Cropper Hopper storage folders, which hold 12”x12” easily, and have pockets inside them that are up high for those small pieces so they don’t get trashed at the bottom. I have one for each colour, although a few do share, like orange & yellow, cream & brown, black/grey & white. Cardstock goes on one side and pattern paper on the other, and because they’re in great condition and I can see exactly what I have, they do get used. Patterned paper is a fantastic way to add decoration. You can use a whole sheet of paper as your background, thereby lessening the need for card stock, or you can just trim or tear a piece to use as a border or other type of decoration. Sometimes, if I’m using a big piece of patterned paper that’s going to have a large photograph over the top of it, I will cut a piece out of the middle. And I do that for a couple of reasons. Number one, it feels like a waste of patterned paper, I mean, it’s all going to be hidden under this great big 10” x 8” photo! I’m going to cut that piece out and use it somewhere else. The reason I may do this is to cut down the bulk in my album. I tend not to enjoy very bulky pages, so if I can cut down on bulk in my album, I will.
Pattern paper also comes in different sizes, but the most common would be 12” x 12” and 6” x 6”. I am a HUGE fan of 6” x 6” paper pads, and I own a LOT of them … so many that I have officially run out of room for new ones! I have a video over on YouTube showing how I took one 6” x 6” paper pad and I used every single page in there to create 66 cards. My hint to you in purchasing your patterned paper is … don’t go overboard. Get what you need for your current project, and maybe a couple of pretty things that make your heart sing. Buying with purpose is a sure fire way not to be stuck with a huge stack of paper years down the track that you never use.
Number Eight – Embellishments
Decoration is an integral part of creating a layout and scrapbooking album, but it is very easy to go overboard buying embellishments, and there are so many different kinds! Embellishments are things like buttons, brads, eyelets, mini tags, die-cuts, washi tape, paper flowers, adhesive gems & pearls, string, twine, ribbon, stickers, frames, staples, and so much more. There have been some really cool trends in embellishments … some of my favourites were coloured hot glue sticks and coloured plastic slide frames.
What I love about my favourite scrapbooking companies is that they release entire collections. You can get papers and embellishments that are fully coordinated, which makes it so easy to make an album completely cohesive from beginning to end. I’ve done this a few times, including a traditional 12”x12” album for a trip we took to Fraser Island many years ago. I used papers and embellishments from SEI (wow … I can’t believe I can remember that, but I can’t remember if I had a cup of tea already today! My brain is so weird.). Okay, so I used this SEI brand with muted pastel shades of blues, greens and browns (which I chose because of all the beach, ocean and whale watching photos I took) … all the coordinating papers, embellishments, and everything that came out with that range. When you use a coordinating range from start to finish, it cuts down on brain strain, it saves time finding things that work together, and the finished album looks incredible.
Number Nine – Pen / Marker
If I had a dollar for every time people have said to me “I don’t write in my scrapbook albums or on my layouts, because I hate my handwriting.” I’d be very rich! Sure … if you don’t like your handwriting, you can type something up and print it out from your computer. However, if you, like me, have ever lost a family member or friend, and you come across a birthday card or a little note with their handwriting on it, doesn’t that count as treasure? I was overjoyed recently to find a little note my dad wrote me, because that’s it, there isn’t going to be any more of his handwriting ever. If you are making albums that your kids are going to keep and look at and enjoy, for them to see your handwriting in there is going to be very important to them. So … I say this with love … you need to get over yourself and use your handwriting somewhere in your album. It doesn’t have to be everywhere, but use it somewhere. It doesn’t matter if it’s just names date, something simple, but somewhere in your family albums, please use your handwriting. It will mean a lot to your kids down the track. This is why having a good pen or marker is important. You want something that you enjoy using, that won’t smudge or fade (or disappear … never use an erasable pen in your album!). Anything that makes you feel good and gives a good result. Oh, and acid-free is a bonus, and if you’re making double-sided layouts, make sure it doesn’t bleed through to the other side. I’ve been known to do a practice run before I write on a completed layout, and usually I write on a separate piece of cardstock that I can add later. If you want to write something quite personal that you don’t want random people to see who may flip through your album, a hidden journal spot, like a tag tucked behind a photo, is an excellent idea.
Number Ten – Storage
I know … it’s not technically something that you use in your scrapbook. But once you start scrapbooking, and you’ve got some stuff, you’re going to need storage. Now I’ve talked a lot about storage in episode 12, so I will also link that one in the show notes. My very first item of storage was a crate that I probably bought at dollar shop, or possibly hanging around my house, like a plastic milk crate kind of deal. When I first started, everything I owned fit into that crate with room to spare. When I went to my first weekend scrapbooking retreat that’s all I took with me, I literally took this one tub. And I was amazed at all these women who had suitcases and tubs and tubs and tubs piled up next to their desks. But we know what happened … the next time I went I had three tubs with me, and I have zero regrets!
That is pretty much all you need for traditional scrapbooking. Yes … there are lots of other things, but you grow into those, and don’t necessarily need them to begin creating a traditional album. So let’s move onto the next style of scrapbooking.
Digital Scrapbooking
This is what I moved to when I kind of burned out on traditional scrapbooking. I didn’t have enough time to create traditional layouts … I needed something quicker. I think I was looking around the Two Peas in A Bucket forums, which is where I discovered digital scrapbooking. Switching to this method was a no brainer for me. I spend a lot of time on my computer anyway, and the only space that digital scrapbooking takes up in your home is on the hard drive of your computer. There’s nothing sharp that may injure tiny inquisitive fingers, it takes no time to pack up or pack away, and it’s incredibly affordable. There are a few things that you need. In fact, there are three things only three things that you need to do digital scrapbooking.
Number One – Photos
Yes … just like traditional scrapbooking, you need photos. You can’t scrapbook without them. With digital scrapbooking, though, you will be using digital images. Given that we all probably have hundreds of photos on our phones, or taken with a digital camera, it’s incredibly convenient. You can also scan your original photos, negatives or slides to use in your digital creations.
Number Two – Photo Editing Software
You don’t need a scrapbooking program, but you do need some sort of photo editing software that allows you to add layers that you can resize and move around. I use Photoshop, however, I know Photoshop is not everyone’s cup of tea. I used to have an old suite, but when I upgraded to my current computer with Windows 10, I found it’s no longer compatible. But any kind of software like Photoshop is going to do the job and if Photoshop pay-by-the-month is out of your budget, I’m going to link in the show notes to an excellent Photoshop dupe. It’s free to use it online and the tools and overall look of it are the same. It’s an excellent substitute for Photoshop. You don’t have to download anything … you just go to the website and do your photo editing there. What you are looking for in photo editing software is the ability to add layers. Just like traditional scrapbooking, where you have your background, and then you put down a border, then you put down a photo mat, which is just a piece of cardstock or paper that’s slightly bigger than the photo and then you put your photo on top of that nice and centered so it creates a frame around it. Then you put down your journaling and your information and your text, then you put down your embellishments. It’s no different in digital scrapbooking … the only difference is that each layer is a different file.
Number Three – Digital Kits / Elements
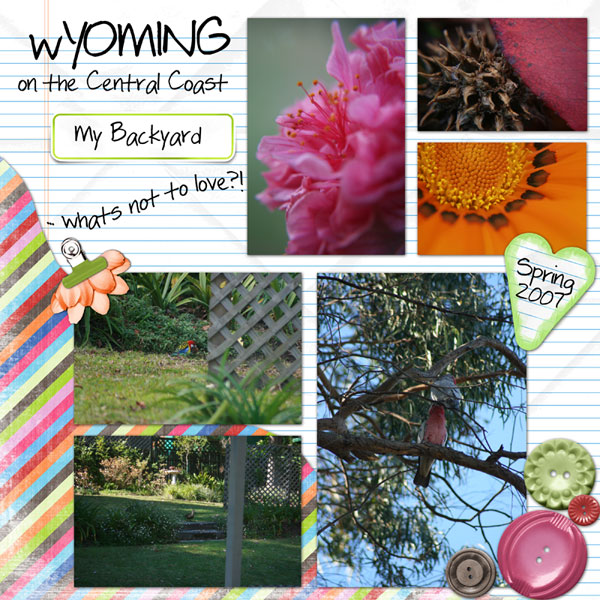
Oh my goodness, when I discovered all these amazing digital things, man, I was just blown away. A couple of years ago I switched computers and had to back everything up. I took the opportunity to go through my digital scrapbooking kits, and I had over 200! I kid you not! When I went back and looked at them, I realized some of them were pretty basic, and I’ve become quite fussy about what I like and don’t like. So I actually deleted a lot of them. They were mostly freebies that I picked up. But I kept my favourite kits and the elements that I would still use. And I still do use them on occasion, I went through a phase where if I needed a quick layout, I would just do it digitally. Here is an example of one of my digital layouts.
If you’ve never used Photoshop, or photo editing software, where you sort of add things in and move them around, it’s going to take a little time, to learn and become comfortable with the program. I would recommend finding software you want to use, then looking up some tutorials on YouTube. The concept of digital scrapbooking is simple. You just put the layers down and you can make things bigger and make things smaller and move them all around. When you’re done with your digital layout, you’ve got a few options.
One of the things I’ve done with digital layouts was to put them into an SD card, which went into a digital photo frame. It’s like running a slide show, and this was a great gift for my mum a few years ago. Another thing I’ve done with them is print them out and put them into a physical album.
My favourite thing that I’ve done with digital scrapbooking is to create photo books. So I wanted to do entire year albums, and the beauty of digital photography was that I could make a full years worth of layouts to go in a 20 or 22 page photo book. When I used templates I could get it done in 1-2 days … soooooo much faster than traditional! When shabby princess brought out templates. I was in heaven! I tell … you I was able to put them together really quickly sitting at my computer in front of the air conditioner, as it’s usually a job I would do in January. The first page is a title page, and the last page is a list of everything we did that year. Sometimes I’d use different kits for every single page and one year I used one kit through the whole album … it looked fantastic. I loved it. It was so quick! There are a bunch of places you can order photo books from here in Australia … we’ve got Kmart, Big W, Domayne, Harvey Norman and Snap Fish and probably more. If they print photos, they most likely do photo books. I’m subscribed to all their email newsletters, and the first one what had a special on 8”x 8” photo books got my order. All I had to do was upload the files to the shop’s website, arrange the pages and place my order. Another great advantage to doing these as a photo book is the space saving on my shelf. They are small and slender, so they don’t take up anywhere near the real estate that a traditional album does. And if that thing gets looked at and loved to death, I’ve still got the files and I can just print number one. Easy peasy. I did that for probably five or six years. As well as making special albums. We went on a cruise and I just did a photo book about the cruise. For my husband’s 40th he had a V8 experience (like he got to drive the car and go on a Hot Lap … all that kind of stuff), so I did a whole album just of all the hundreds of photos I took on that day. Digital Scrapbooking is fast, and once you get used to your software it’s easy … and … it takes up no space, it’s just on your computer. If you are computer minded, this might be an excellent choice for you.
Let’s move on to the third style of scrapbooking that has been incredibly popular and that is pocket scrapbooking, also known as Project Life. Becky Higgins was on a winner when she introduced this to the scrapbooking community. Pocket scrapbooking is amazing. Now I haven’t done an entire pocket scrapbook. But I have done some pocket scrapbooking for magazine pieces, and I thoroughly enjoyed it.
Number one – Photos
Have you noticed photos are the number one thing that I always say you need? That’s because you can’t make a photo album without photos.
Number two – Album
These days, I think most of the albums that go with the pocket scrapbooking page protectors are ring bound albums. But if you have post bound albums, just use what you have.
Number Three – Special page protectors
The page protectors are what makes this type of scrapbooking different. Rather than just one big 12 inch square page protector where you slide a finished piece in the top, the project life or pocket scrapbooking page protectors have sections and segments in different sizes. They might just have 6” x 4” or 2” x 3” little pockets (or other sizes), and you can just pop your photo in, no adhesive required. No mats required, but you absolutely can mat your photos if you want to. Page protectors come in different pocket configurations, and you can mix and match them within your album.
Number Four – Project Life Cards
You can purchase Project Life or pocket scrapbooking cards in different sizes that match up with the different size pockets in the special page protectors. Project Life make beautiful cards … Heidi swap … Kaiser craft as well. They are double sided cards which usually have little rounded corners. Some designs are purely decorative, others are specifically for journaling. You can pick which one you want, showing on one side of the page, and then other side showing through the opposite side on the other side of the page. Very clever. Just grab a Project Life card, write on your story, names, dates … bam … pop it in a pocket and you’re done.
Can you still fuss around and use embellishments and all that kind of thing? Absolutely! Keep it super simple with cards and photos only, or use all those fantastic traditional scrapbooking embellishments, cardstock and pattern papers to create your own cards.
Now there are other styles of scrapbooking as well, and I’m not going to go into as much detail on these, but I did want to mention them. I’ve seen some albums that focus mostly on the writing, with small photos, and minimal decoration. These are usually in some style of planner … it might be a travellers notebook or a Bujo. Another very popular style is Project 365. I did a couple of massive project 365 projects . It’s a fun project, if anyone’s keen on trying it, I’m happy to walk you through my successes, failures and the method I settled on. And then of course, we’ve got hybrid forms where perhaps you create a layout digitally, perhaps 8” x 8” but then you stick it into traditional 12” x 12” album with some embellishment, paper and card stuck around it. My project 365 was a hybrid Project Life digital project. And I’ve done a whole bunch of other hybrid combos as well.
When it comes down to it … there’s not just one way to scrapbook. There’s no right way or wrong way. Just make sure that your photos are safe, and your memories are recorded.
This takes us into why we scrapbook.
Essentially the reasons why we scrapbook, and why I consider this to be an important craft, it goes back to that idea that photos are important. For example … when you lose someone close to you, the photos of them become very precious to you. They jog your memory … places you went, things that happened, stories you remember. Photos are, I think, emotionally very, very important. And then we have the family history aspect of it as well for those who are into genealogy.
Photos are important. That’s why we don’t put permanent adhesive on the back of a photo from 1890. Right? We scrapbook because we want to record memories. We scrapbook because we want to record family. We scrapbook to create a legacy … information and stories about our kids’ childhood, for them to look at when they become parents … it’s natural to want to compare their kids to themselves … it makes a lot of sense. We scrapbook for the creativity. It is flat out fun to unleash your creativity … to enhance and embellish and add to the story. And there are the fun toys … what can I say? And let’s talk about the social aspect of this. Going out to a scrapbooking store buying some things, chatting to other customers you meet in the store, chatting to the people who work in the store. There are events where you scrapbook together with others. Some of the best memories I have are scrapbooking weekends. There was one that I attended, only a couple of weeks after my father passed away and I almost didn’t go. But my husband and my mum, insisted that I go. So I went and I had the best time. It was a break from being all deep and serious, planning the funeral and trying for the umpteenth time to explain it to my kids. I went, and I laughed so much. It was great tonic. And I was able to take pictures of my dad with me and record memories while they were fresh. And it was very cathartic experience.
As much as we put into scrapbooking … the time, the effort, the thought, the money, the supplies, space in our homes … As much as we put into these albums, I feel that scrapbooking has given me so much more. It provided me with an income, as I have worked in a few scrapbooking stores now. I met one of my best friends in my first scrapbooking store job. And she introduced me to swapping … oh my goodness! I joined this swap group called Oz Swap Till You Drop, which was founded by Rachel Greig from Darkroom Door. I loved that group, and it was my absolute obsession for years. I actually ended up owning that group in the long run, and met two more of my very, very best friends in the world through that swap group. I can’t imagine my life without these women in it, I really can’t. Scrapbooking has given me friendship, confidence, income, so much joy. It has also given me a superpower … it gave me some skills that allowed me to do two very, very important projects.
The first project was my grandmother’s photo albums. So, when my grandmother was in her late 80s, I started to think to myself, you know, she’s getting up there in age, we should probably work out the family photos. She had this family album with photos of her mother going back to 1890. Oh man, to actually hold a photo that old in my hands was very weird.
The goal was to record the names, places and dates. Who were these people? I know that this is important because I have a box of photos from my father’s youth. And now that he is gone, I can’t ID anyone in these photos. I don’t know why they were important to him. All I know is that they were important to him because he kept them for so long. So I made a day and I travelled down to Sydney and spent the day with my grandmother. The plan was to remove the photos from the album, get them safely stored and record all the memories. However, they were so firmly stuck in that album that I had to be flexible. I had a sketch book … I sketched out the layout of each page, showing where the photos were, and numbered each within the sketch. Then we worked through every image, and I wrote the details next to the number of each photo. Some photos didn’t really have a big story, and only approximate dates. But some of them had quite important stories to go with them. There is a photograph in the album that is known in my family as ‘The Photo’. It’s a beautiful photograph taken of my grandmother after she had sung at a wedding in Sydney. And it’s the photo that introduced her to my grandfather. Now the story had always been told in one way to me and when my grandmother sat down with me that day, she gave me different details. I’ve been telling this story wrong my entire life! It was so wonderful to hear the story from the original source. As it turns out, my grandmother’s very cheeky friend from up the road had nicked this photograph and included it with fruit cake in a care package that was sent to the boys at the front. The solider who received the photo already had a sweetheart back home, so he passed it along to his mate, who, upon seeing it, declared that he would marry that girl when he got home. And he did. He brought the photo back with him. This photo survived Tobruk and various other postings. And here it was sitting in the album. I wouldn’t be here if not for that photo, a cheeky friend and a fruitcake. How wild is that? I mean, what a wild concept. The next task in this big project was to take all the photos home with me, which I did, having been made to promise to take very good care of them, which I did. I scanned all the photos and recorded all the information that went with them. Every photo file was given dates, names, and any information as the file name. So anywhere the photo goes, that information goes with it. It was a big job, but a very worthwhile job. My next task was to use Photoshop to restore it best I could … taking out dust marks, wrinkles, rips and any damage, as best I could, and restore the photos. My third task was to make them a printable size. I tried printing the very smallest photo and trust me it was teeny tiny. And when I printed it full size, it was just a pixelated mess, completely unrecognisable. So … I created 6” x 4” files, I dropped in the photo, making it as big as I could without losing definition. For a lot of them, I added text, so the names, the dates, the places the stories, I added it right there on that printable.
The very last thing I did was to create a CD (that’s how long ago I did this project … before thumb drives were cheap and readily available). Each disc had three folders … original scans, restored scans and the printable images. That was my Christmas gift to my family that year, and it meant that everybody had the family photo album. When my grandmother passed last year, it really didn’t matter who got the album because everybody had the photos. That was because I was able to use my scrapbooking superpowers (also my Photoshop superpowers), and everybody really enjoyed that gift.
The second project that I did was a really important project. And I’m warning you right now, you may need tissues for this one. While it’s not a happy story, it demonstrates an important point. So my friend, the one who got me into scrapbooking, passed about 15 years ago. It was very sudden, very unexpected, caused by an extremely rare pregnancy complication. She passed one day, and her baby boy passed the next day. You know … when someone passes away, if you have a friend who’s lost a parent for example, you say “If there is anything I can do to help, please let me know.”. Sometimes people do take you up on that offer, but oftentimes people don’t. I made that offer, and this time, my friend’s mother in law took me up on my offer. She asked if I could please take her scrapbooking supplies and make three memorial albums. One for her husband and daughter, one for her in-laws and one for her parents. It was going to be an emotional and difficult project, but who was I to say no to that request? This was important. Her little girl needed those photos in one place with memories recorded. And so while it was a big project, three big projects, and it was a tricky project … I did it … because I could. I learned stuff about my friend I didn’t even know. We became friends in our mid 20s. I didn’t know her as a child. I didn’t know her as a teenager. And as I spoke to her husband, her sisters, her parents … I was getting all these stories and the information that went with the photographs. It was so nice to learn more about my friend and to be able to leave her family with this album … these memories that they could keep and hold on to even though she wasn’t there anymore. I’m sorry to bring a sad story to the podcast. But it’s an important story, for a couple of reasons. As crafters, we have crafting superpowers that we can use to do really good things. There are so many charities that you can craft for … it’s mind blowing! I think there’s an entire episode on that subject just alone.
Now, you may never have to do a memorial album, and goodness knows you probably don’t want anybody to ever have to create one of you. So, I have a request to make of you, the scrapbookers. And even those of you who aren’t scrapbookers, because it’s not necessarily a scrapbooking thing. If you are a mum who doesn’t get in front of the camera because you don’t have makeup on, or your hair needs a colour, or you’re waiting to lose a few kilos … please let that go. Our kids don’t care about that stuff, they just want to see pictures of you the way they remember you. It’s time to get in front of the camera, because when you’re gone, those photos will be very precious to them. I have an album (which actually needs updating) that will pass to my kids when I’m gone, full of my favourite stories and memories, and things I want them to know. I work on this album so that nobody else has to, and all my stories are told. I even got my mother to do a little project where she pulled a journaling prompt from a jar every day, stuck it into a notebook and wrote her answers, stories and thoughts in a book. She assures me it will be an interesting read.
Now when it comes to scrapbooking, we’ve talked about all these different methods, and I want you to know that there is no one right or wrong. You pick what works for you. Start simple. Maybe pick an event that you want to just do one album … maybe a small six by six album. When you do get into scrapbooking, it is very easy to go overboard and buy ALL the things. I have so many suppliers that I have bought, that are sitting in my cupboard, 15 years old or older. My best advice is to shop with purpose. Really decide what you’re going to do and do some planning. Cards on the table, I don’t always plan but when I do, I save time, I save money, it saves my brain. Any time I put into planning saves me so much time later. Sketches are a great resource … there are literally thousands of scrapbook layout sketches online (Becky fleck does some of my favourites). Start looking at the way people work, and you’ll know the ones you like. Personally, I like fairly clean and simple. I don’t use lots of embellishments, and I’m not keen on layouts where you can even find the photograph where it becomes more about the product and less about the photo. I’m all about the photo and probably less about the product. That said it didn’t stop me from buying plenty of products. But if you want to start just start simple look around. Have a look. What do you like? What kind of size do you think you want to have? Go from there. It’s so easy to get caught up in the stuff. But always bring it back to recording the memories because it’s important. Make sure your handwriting is in there. I will link to all of the things that I’ve mentioned today in the show notes. You can find a full transcript, photos, links … the whole nine yards over on the blog post so you can check that out. Again, that is www.dawnlewis.com.au/podcast16. I hope that you are inspired to record the memories that go with your photographs. It can be as simple as maybe sitting down with an album one night, pulling out a photo, remembering the story, jotting it down on an index card and pop it in behind the photo in the album. Start small and leave your beautiful legacy.
LINKS
Photoshop substitute
3mm double sided tape
12mm double sided foam tape
Tombow mono liquid glue (I will come back and add a link when it is back in stock)
Dot runner adhesive
Episode 4 – Trimmers
Episode 12 – Storage
Becky Fleck scrapbooking sketches