How did I use something old + something new + pre-coloured images + a card sketch, try a different card making style, work with limited supplies & tools AND make my Dotty swap cards? I’m so glad you asked. I’d love to tell you!
When I put together the All Occasions Box last year, the goal was to create resources to help people make cards that they could send all year round, for many reasons and seasons. I deliberately did not include stamps, dies or stencils in the box, because, let’s be real … we already have those, right?! What I did spend a lot of time creating, though, was a full 12 month calendar packed with activities and resources for the All Occasions Card membership. Yesterday we had our second live craft-along. Normally I would be working at my craft cupboard, because all my card making stuff is there. However … I knew it would be a full house here, with no access to my cupboard, which would necessitate me crafting in my office. I had to figure out how to run a live crafting session in a really small space and minimal supplies, and it ended up working quite well. I even made some more cards this morning.
I wanted to share the three things that might help you have a fun card making session from the couch or kitchen table, out with a friend or on vacation. These are occasions where you might need to travel light or create in a smaller space than usual.
1. Planning
It is said that every minute spent planning saves 10 minutes in execution, and I often find this to be true. Yesterday was no exception. Here is the process I went through so that I could just sit down and start making cards in the place where I usually make spreadsheets and pack orders.
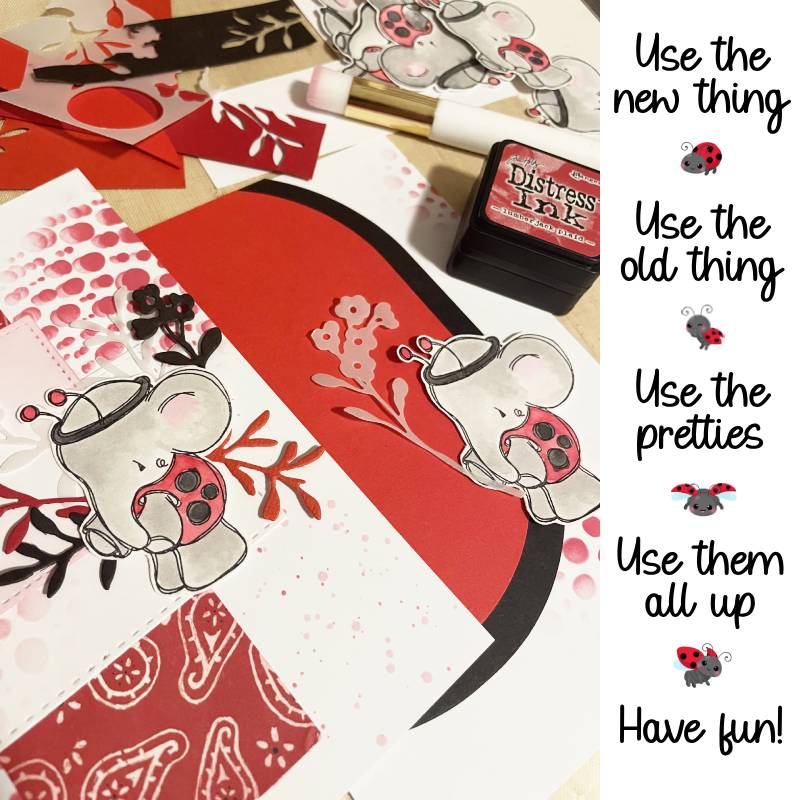
- Project – I decided to make my Dotty card swap panels.
- Feature stamp image … the elephant from Dotty About You (Tracey Hey).
- Style – if I was inking up my first Tracey Hey stamp set, then I was going Tracey Hey all the way!
- Colouring medium, and picked out watercolour paper & Distress Inks.
- Prep – I stamped, painted & fussy cut 8 little ladybug elephants in front of Netflix in the evening.
- Design – I chose a favourite card from Pinterest.
- Plan – I made a list of what I would need to make that card on the day.
Couch crafting is not new to me, in fact I keep some card making basics on a little IKEA trolley in my living room. It has a neat little chopping board that fits on top, serving as a tiny craft desk. I just needed to add to it before my cupboard was blocked off, and move it into my office.
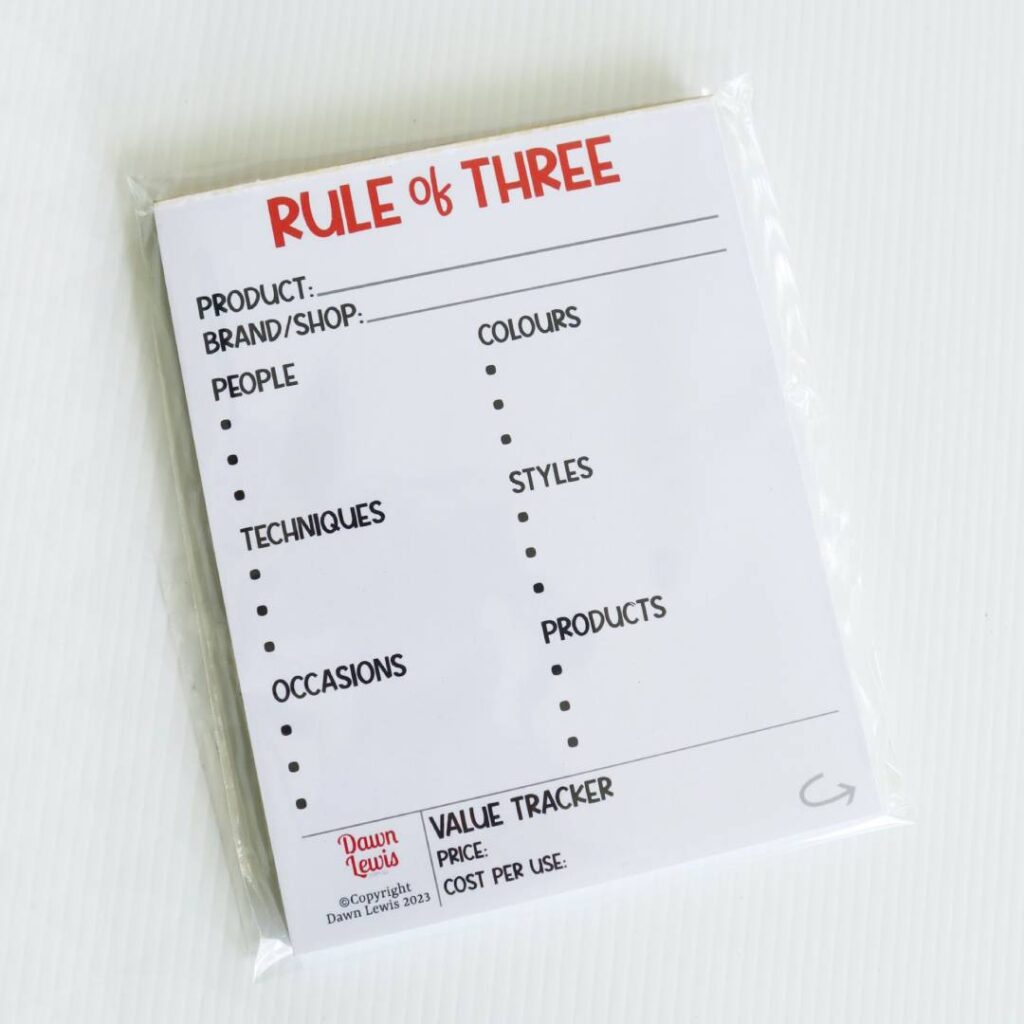
An excellent tool for planning is the Rule of Three notepad. If I have a great idea for a stamp or die set as I’m doing my cataloguing, I note it down and add the slip into the packaging. I plan to do more of this when I move out of spreadsheet phase and into new-storage-and-organisation phase. The benefit is that when I have great ideas, but no time to craft, I can make the notes. Then when I have time to craft, but no ideas, it doesn’t matter, because past-Dawn left me all her great ideas! And yes … these are available in the shop HERE.
2. Something old, Something New
I have been cataloging my stamps, dies & stencils, and in doing so I’ve had quite the reality check. I have a lot of old things, but also a lot of new things … and in both categories, some have been used, but a lot have not even been taken out of the packaging. The only way to justify maintaining my current stash and the real estate it takes up in my home, is to use it. So how did I choose what to use, when I have so much to choose from? If my catalogue spreadsheet project was complete, I would have searched for key words, like dotty, spots, polkadots or circles. However, that is a work in progress, so I started with the list from my planning phase.
- Colour scheme – based on the red/black/grey elephants I coloured earlier in the week.
- Paper – Rather than searching huge stacks of papers for something new, I grabbed my paper scrap sleeves to match my colour scheme.
- Dies – I keep all stand-alone dies in an A4 plastic document holder, which is easy to store in the trolley.
- Stencil – I keep my stencils blu-tak’d inside my cupboard door. If I can see it, I use it, so it was easy find one to suit the dotty theme.
- Tools – I put my Big Shot die-cutting machine comfortably on top of the IKEA trolley board, and small trimmer was already in my office.
3. Leaving the Comfort Zone
I did this literally and figuratively. I’m definitely more comfortable at my cupboard desk or on the couch that in my office. I also switched up my usual style.
My card making style is typically quite minimal. I try to stretch my paper, cardstock and embellishments over as many projects as possible. And while I love the look of many different styles, every time I sit down to create, the result is brightly coloured CAS (clean and simple). My efforts to catalogue my stash has helped me to see exactly how much I have, and I am confident that I could make cards every day for a year, and still not run out of paper, cardstock or embellishments.
So what am I going to do about that?
- Be inspired – each month I am sharing one of my favourite cards that I’ve had squirrelled away on a Pinterest board for years, and share it with my All Occasions Card group. During our live craft-along sessions, I’m going to attempt to put my spin on it.
- Be influenced – each month I will choose a favourite card maker or style, and attempt to emulate it with my existing supplies.
- Be brave – each month I’m going to try a technique I haven’t tried before.
- Be smart – literally every bottle, jar, tube & box in my stash will eventually end up in the bin, so I’m going to make sure they go in the bin empty, not full of dried up or expired product that was never used.
Yesterday I embraced my inner Tracey Hey (designer of the cute elephant stamp in Dotty About You). She is known for her no line watercoloured stamps, random background stamping, stencilling and spattering. I ended up adding the black outline to my watercoloured stamped images, and had I remembered to take stamps into my office with me, I would have tried that as well. I may not have gone very out of my comfort zone, but it was a start, and I am very happy with the results.
Next month I am going to channel my inner Lou, my amazing friend in the UK. She makes the most delectable layered & distressed cards with die-cut elements, all featuring coordinating pattern papers.
What’s next?
Well, for me … in an effort to use more and waste less, I’ve set myself a few goals.
- Complete my craft catalogue spreadsheet so I can search for sentiments, themes & imagery.
- Tweak my existing storage so that it’s easier to find and use what I own.
- Get all of my finished cards organised into categories so I can send them more often.
- Use up leftovers and let nothing go in the bin until I’ve maximised the fun within.
- Destash the items I know I won’t use so they can go have fun in a new home.
Whether you’re just starting out, or looking to expand your card making skillset, here are a few resources you might find helpful.
- The Craft Room Podcast – listen on your podcast app or Spotify, read and/or listen on the blog. Podcasts are a great free resource for learning – more info HERE.
- YouTube – I have loads of card making tutorials, many of which cover multiple ways to use a single stamp or die set. YouTube is another great free resource for learning – my channel is HERE.
- Card Maker Success Summit – this is a free virtual card making event over 4 days. I’m not running this event, but I am presenting a video workshop, and I have more information on the blog as well as the podcast HERE. There is a VIP upgrade option, and my hot tip is that if you know you want the All Access Pass, get it at the early bird price immediately after booking your free ticket 😉
- Membership – If you are looking for additional support to help you reach your card making goals this year, there is a membership available. Those who become founding members during February / March will pay the introductory price for the life of their membership, even if prices go up. More information on the 3 membership tiers HERE.
- Copic Subscription Box – if you’re looking for real-time video classes with everything provided, there are loads of options (with and without markers). I designed these for beginners, and they not only build a functional Copic collection, but the skills learned are built upon in each lesson. You can find them HERE.
Lastly … all of these tips today should come in handy for this last activity …
Crafternoon live crafting day – On Saturday 16th March I’m hosting a crafting day at the Wyoming Community Centre on the NSW Central Coast (Australia, of course), 10am-8pm. More information HERE, but in a nutshell, it’s a lovely little hall with room for a dozen crafters. Everyone can bring whatever project they’d like to work on, BYO lunch & dinner (there is a fridge & microwave) and favourite personal snacks. I am providing tea, coffee, sugar & milk as well as morning & afternoon tea, and there will be a mini wax seal class (and everyone can use the wax seal station throughout the day).
And for those who might not want to come along and craft, I will be bringing as much of the shop as I can pack into my car. If you would like to pop in and shop in person or pick up an order, you are more than welcome to do so.
So … what’s next for you? And what’s one thing you could do this week that will move you closer to that goal? Whatever you choose, I hope you have fun doing it!